This post is a direct follow-on from previous posts covering MusicLab and
might be better understood having first read the preceding articles.
What does Arduino and Pure Data have to do with Hi5! ?
Hi5! is dependent on the use of a
MaKey MaKey and
Pure Data in order to function properly and without them, it would merely be a large piece of wood, acrylic and metal -
more decoration than exploration, had that been the case. To simplify the connection between the three, try and visualise it as follows:

- Computer
- running Pure Data
- [USB 2.0 to USB Mini]
- MaKey MaKey
- identified as Human Interface Device
- [MaKey MaKey inputs/ ground to...]
The computer is the nerve centre of Hi5! as it hosts the Pure Data visual programming software - responsible for interpreting the participants interactions - and all of the audio that is triggered as a result of these interactions and interpretations.
The MaKey MaKey is the device that forms the conceptual backbone of Hi5! This clever piece of hardware works on the principle of 'completing the circuit' -
very much like turning a light on and off with a switch - but with the added benefit of being able to programme it to output any
ASCII character (or practically any symbol your can generate with you computer keyboard).
The Hi5! board itself is 'the face', 'the UI' or the graphical interface that the public is able to interact with, whilst simplifying the experience and providing a larger, more accessible piece of hardware -
the MaKey MaKey is small and mighty, but delicate all the same and may not withstand being continually manhandled by 30+ people an hour.
Arduino and MaKey MaKey
Having established that the MaKey MaKey is identified as a HID by the computer and that it is also programmable, you may be wondering what was actually programmed into the MaKey MaKey, if anything at all?
It all relies upon the features of the MaKey MaKey and the potential that they can offer.
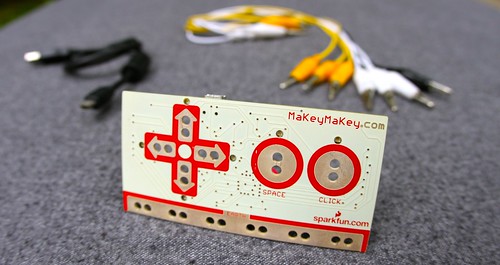
 sparkfun.com, 2014") |
| Underside view |
The device used has 18 inputs:
- 12 on the back
- two rows of 6 inputs on female header strips
- 6 on the front
- represented by the arrow pad, space and click
 sparkfun.com, 2014") |
| Topside view |
There are various Ground inputs too:
- 6 on the back
- a single row of 6 inputs on a female header strip
- 6 inputs on the front via alligator/crocodile clip connection
By default - if you were to connect the MaKey MaKey to the computer and use it to control an application i.e. word processing software - the device would output the following values:
Underside-Left inputs:
- 'up', 'down', 'left', 'right', 'left-click', 'right-click'
Topside inputs:
- 'up', 'down', 'left', 'right', 'space', 'left-click'
These default values can be changed, as mentioned, to any
ASCII character. The choice of values is more important for Pure data in that, for the concept to work, there could be no repeated characters -
they all had to be unique. This is where Arduino comes into play.
You can
download the Arduino software, sketch and settings files that will allow you to edit the output values for the MaKey MaKey. The files should look something like the following images:
 |
| [settings.h] - output values |
 |
| [makey_makey_1_4_1] - default sketch |
Under the [settings.h] tab you can view the default values assigned to each pin and changing them is simpler than you might think. To change a value all you need to do is highlight, or click just after the character, then type in the new character you wish to be outputted upon triggering.
Once you are finished assigning new characters the device can be updated. Checking that the sketch is accurate - by clicking the green tick in the Arduino software - will confirm that there aren't any mistakes and then clicking the green arrow will upload/update the MaKey MaKey settings with the new values. Note: the MaKey MaKey must be connected to the computer via USB and selected via the correct port in Arduino before any updates can be applied.
For reference, the choice of values were as follows:
- 4 of the inputs were assigned the values of '1', '2', '3' and '4' respectively
- These were the 'technique' identifiers - bow, wind, hand, mallet
- The other 14 inputs were assigned alphabetical values starting from 'a' and continued until 'n'
- These were the 'instrument' identifiers
This kept it all fairly simple, but crucially ensured that each character was unique and non-repeating.
Pure Data
 |
| (c) fernadoquiros, 2014 |
Visual programming software developed by Miller Puckette, it is another example of dataflow programming -
alongside Max/MSP - within a graphical environment (
Pd, 2014).
It is the interpreter and brain of Hi5! - translating the values it receives via the MaKey MaKey (HID), applying a set of logic based rules, before triggering an audio file that should relate to the combination of 'technique' and 'instrument' as chosen by the participant.
The Pure data patch was quite simple in its conception and was organised in a logical manner: columns of 'techniques' and rows of instruments. Each corresponding sub-patch was identical to the rest with an exception occurring when there were more audio files for a particular sub-patch.
Despite the incoming values from the MaKey MaKey being alpha-numeric ASCII characters, Pure Data would require its own interpretation of these values. Each ASCII character - case sensitive - has its own unique number assigned by Pure Data - for example 'a' = '97', whereas 'A' = '65'. To determine what the Pure Data equivalent values were I used the [Key] and 'Number' object, which displays the number associated with a particular ASCII key when triggered.
 |
| Pd - working out the ASCII character equivalent |
Once these numbers were known they could then be used to establish the rules for triggering the audio files.

Each sub-patch took on the following form:
- Combination 'gate'
- Random selection sub-patch
The signal chain for all of these patches is in a linear manner in that the logic principles behind each sub-patch must be satisfied before the next sub-patch can trigger...right up until the audio is triggered.
Pure Data logic
To aid the visualisation of how Pure Data works, use this example of the most common data comparison object used in the Hi5! patch:
- Once triggered, the signal reaches an object - i.e. [Sel] - that compares the values it receives.
- It operates based on what data you input into the [sel] object to begin with:
- If left blank, it will allow for two inputs of data to be compared
- Similarly, if only one number is entered - i.e. [sel 49] - you will also get two inputs, but in the case of Hi5! only one input was needed in this scenario.
- If more than one number is entered - i.e. [sel 1 2 3] - there will only be one signal input, but there will now be four signal outputs that will trigger (if desired) when the incoming data matches the stored data - the 1, 2, or 3 - and its associated output.
- Once the object conditions are met, it can be designed to output a trigger, also known as a 'bang'.
- This can be altered to trigger a different output, if needed, by adding a number object that is inserted into the signal chain before being triggered by the preceding 'bang'.
The Combination 'gate'
This compares the incoming data - from 'technique' and 'instrument' - against the predefined values in order to 'open' the gate, thus triggering the next stage of the chain.
 |
| Combination 'gate' |
In order for Hi5! to operate correctly, the Ground nodes are housed as part of the 'technique' nodes and control whether or not the 'gate' opens and closes. Using the [Key] and [Keyup] objects, the [sel] object outputs a '1', when the correct values have been triggered, continuing the signal flow. If the 'technique'/Ground node is released, the [Keyup] function 'closes' the 'gate' by triggering a '0' output that conflicts with the necessary conditions needed to satisfy the [sel] object. This is also a feature that stops multiple techniques from triggering audio when released as it requires the node to be reactivated to open the gate again.
Random selection sub-patch
Once the conditions have been satisfied, the path is then randomised for the benefit of the audience to ensure that the choice of audio clip does not appear sequential or repetitive due to a cyclical progression.
 |
| Randomiser |
The [shuffle 1 6] object randomly selects a number from a range of 1 to 6 and if this number satisfies the [sel] object to which that number has been assigned, it will continue the signal flow through that path. Each path leads to a different audio sample hence the desire to randomise it in the first place.
Audio sub-patch
When the inlet in this sub-patch is triggered, it simultaneously opens and plays the associated audio file. The volume and, subsequently, the duration of this audio file are controlled by another sub-patch that affects the triggering of the fade out. Each fade out is over a time of 4 seconds.
 |
| Audio sub-patch |
 |
| Fade out sub-patch |
Each main sub-patch is the same, but varies based on the number of audio files used. I do hope that this outline helps to convey the concept of the programming despite not going through and explaining every last function object by object.
Easter Egg
Blame popular culture for this...once the notion of including such a feature was deemed possible, it was an inevitability. It is a fun addition to the Hi5! board, but not an obvious one as it is based on the methodology for triggering existing sounds. Whilst I will not explain exactly HOW to trigger the easter egg, I will leave the following images of the sub-patches so that the more observant of you can piece together how it is achieved. That said, anyone who has a good knowledge of Pure Data could probably work it out just from the data within the images and the corresponding MaKey MaKey assigned values. You may also fluke it...in which case, good for you! :-)
 |
| Easter egg main sub-patch |
 |
| Easter egg combination selector |
 |
| Easter egg randomiser and file selection/fade control |
I hope this has been an informative read and, whilst the Pure Data programming wasn't the most beautifully constructed or streamlined that it could have been, I hope you can appreciate Hi5! for what it is. I enjoyed undertaking this project and have learnt more than I could have hoped. I should finish by thanking the Philharmonia Orchestra for providing the opportunity to be a part of the overall MusicLab installation, but principally for the trust and support to allow Hi5! to become what it has.
Thanks for reading,
J

 makeymakey.com, 2014")